Objectives
Refactor the dashboard controller to show summary on of the playlists + link to show playlist details.
Exercise Solutions
This lab requires that the gomix-playlist-1 lab be completed. If you have lost your solution, create a new project in Gomix and select the import from github option and enter edeleastar/gomix-playlist-1 to import a completed version.
Exercise 2: Add a new playlist
Extend the JSON file to include an additional playlist - so that three playlists are displayed on the dashboard.
Exercise 3: Introduce IDs
When manipulating data maintained in JSON, or other external format, each object will often require an ID in order to manipulate the information effectively. Introduce an ID for every playlist, and every song.
Exercise 4: New Fields
Extend the playlist to have new entry called duration. Also, extend each song to also have a duration field + a genre field.
Modify the dashboard view to display these new fields.
Solutions
models/playlist-store.json
{
  "playlistCollection": [
    {
      "id" : "01",
      "title": "Beethoven Sonatas",
      "duration": 35,
      "songs": [
        {
          "id" : "04",
          "title": "Piano Sonata No. 3",
          "artist": "Beethoven",
          "genre": "Classical",
          "duration": 5
        },
        {
          "id" : "05",
          "title": "Piano Sonata No. 7",
          "artist": "Beethoven",
          "genre": "Classical",
          "duration": 6
        },
        {
          "id" : "06",
          "title": "Piano Sonata No. 10",
          "artist": "Beethoven",
          "genre": "Classical",
          "duration": 4
        }
      ]
    },
    {
      "id" : "02",
      "title": "Beethoven Concertos",
      "duration": 23,
      "songs": [
        {
          "id" : "07",
          "title": "Piano Concerto No. 0",
          "artist": "Beethoven",
          "genre": "Classical",
          "duration": 8
        },
        {
          "id" : "08",
          "title": "Piano Concerto No. 4",
          "artist": "Beethoven",
          "genre": "Classical",
          "duration": 3
        },
        {
          "id" : "09",
          "title": "Piano Concerto No. 6",
          "artist": "Beethoven",
          "genre": "Classical",
          "duration": 4
        }
      ]
    },
    {
      "id" : "03",
      "title": "Beethoven Variations",
      "duration": 67,
      "songs": [
        {
          "id" : "10",
          "title": "Opus 34: Six variations on a theme in F major",
          "artist": "Beethoven",
          "genre": "Classical",
          "duration": 11
        },
        {
          "id" : "11",
          "title": "Opus 120: Thirty-three variations on a waltz by Diabelli in C majo",
          "artist": "Beethoven",
          "genre": "Classical",
          "duration": 45
        }
      ]
    }
  ]
}
views/dashboard.hbs
{{> menu id="dashboard"}}

{{#each playlists}}
  <section class="ui segment">
    <h2 class="ui header">
      {{title}}
    </h2>
    <p> Total Duration: {{duration}} </p>
    <table class="ui table">
      <thead>
        <tr>
          <th>Song</th>
          <th>Artist</th>
          <th>Genre</th>
          <th>Duration</th>
        </tr>
      </thead>
      <tbody>
        {{#each songs}}
          <tr>
            <td>
              {{title}}
            </td>
            <td>
              {{artist}}
            </td>
            <td>
              {{genre}}
            </td>
            <td>
              {{duration}}
            </td>
          </tr>
        {{/each}}
      </tbody>
    </table>
  </section>
{{/each}}
Playlist Summaries
We would like to change the app to just display a list of playlists on the dashboard, not the complete contents of each playlist. Replace the current dashboard with the following:
views/dashboard.hbs
{{> menu id="dashboard"}}

{{#each playlists}}
  <section class="ui segment">
    <h2 class="ui header">
      {{title}}
    </h2>
    <p> Total Duration: {{duration}} </p>
    <a href="#"> View </a>
  </section>
{{/each}}
This will render like this:

The view links are currently inert, but we would like them to cause a new view to be rendered, containing the playlist concerned.
As each playlist now has an ID, this can make this convenient to implement. Here is a new version of the view link:
<a href="/playlist/{{id}}"> View </a>With this change in place, try hovering over each view link (without pressing it). In Chrome, keep an eye on the stats bar which should show a the link including the id:

Hover over each link and note how the ID changes. Clicking on any link causes the following error:
Cannot GET /playlist/02We need a new controller to display a new view containing the playlist details. We will do this in the next step.
Router + Controller
The starting point for any new link in our app is to first define a route to support this link. All supported routes are defined in routes.js
routes.js
'use strict';

const express = require('express');
const router = express.Router();

const start = require('./controllers/start');
const dashboard = require('./controllers/dashboard.js');
const about = require('./controllers/about.js');

router.get('/', start.index);
router.get('/dashboard', dashboard.index);
router.get('/about', about.index);

module.exports = router;
In particular, these are the three routes currently supported:
router.get('/', start.index);
router.get('/dashboard', dashboard.index);
router.get('/about', about.index);
These are the three patterns our app responds to: /, /dashboard and /about. Any other pattern will generate a not found error from our app.
We now have a new pattern /playlist/id, which we would like to route to a controller that would render a new view detailing the playlist contents. Also note that each of these statements matches a route pattern with a function inside a controller. So, for instance, this import + route:
const about = require('./controllers/about.js');
...
router.get('/about', about.index);
... ensures that this function would be called if the route was triggered:
const about = {
  index(request, response) {
    const viewData = {
      title: 'About Playlist Maker',
    };
    response.render('about', viewData);
  },
};
Make sure you understand this connection before proceeding.
Controller/View/Route
Bringing in a new controller usually requires three things:
- a controller
- a view
- a route
Here is is the new controller:
controllers/playlist.js
'use strict';

const logger = require('../utils/logger');
const playlistCollection = require('../models/playlist-store.js');

const playlist = {
  index(request, response) {
    const viewData = {
      title: 'Playlist',
    };
    response.render('playlist', viewData);
  },
};

module.exports = playlist;
This will render a view called playlist. This is the playlist view (for the moment):
views/playlist.hbs
{{> menu}}

<section class="ui center aligned middle aligned segment">
  <h2 class="ui header">
    Playlist Details...
  </h2>
</section>
Finally, the route. This will require the controller to be imported:
routes.js
...
const playlist = require('./controllers/playlist.js');
...
... and then we can add the new route:
router.get('/playlist/:id', playlist.index);Notice that the route includes this segment: /:id. This means it matches any route that includes an extra wildcard segment at the end.
Implement all of the above now and verify that the view is rendered as expected.
Playlists
In order to display the correct playlist, we need to extract the id from the url. Modify the playlist controller as follows:
  index(request, response) {
    const playlistId = request.params.id;
    logger.debug('Playlist id = ', playlistId);
    const viewData = {
      title: 'Playlist',
    };
    response.render('playlist', viewData);
  },
We are extracting and logging the id here:
    const playlistId = request.params.id;
    logger.debug('Playlist id = ', playlistId);
Run the app and select each of the playlist links in turn. The logs will display each of the Ids in turn.
We need to find a way of locating the playlist with the id, and then pass this specific playlist to the view to be rendered. This requires a rethink of the model, in particular the playlist-store.js module.
Here is a new version of this module:
models/playlist-store.js
'use strict';

const playlistStore = {

  playlistCollection: require('./playlist-store.json').playlistCollection,

  getAllPlaylists() {
    return this.playlistCollection;
  },

  getPlaylist(id) {
    let foundPlaylist = null;
    for (let playlist of this.playlistCollection) {
      if (id == playlist.id) {
        foundPlaylist = playlist;
      }
    }

    return foundPlaylist;
  },
};

module.exports = playlistStore;
In this version, we have an object playlsitStore one attribute:
playListCollection: this is the array of playlists loaded from the json file.
and two functions:
getAllPlaylists(): return all playlistsgetlPlaylist(id): locate and return a specific playlist.
The Dashboard controller will have to be refactored to use this object:
controllers/dashboard.js
...
const playlistStore = require('../models/playlist-store');

...

const dashboard = {
  index(request, response) {
    logger.info('dashboard rendering');
    const viewData = {
      title: 'Playlist Dashboard',
      playlists: playlistStore.getAllPlaylists(),
    };
    logger.info('about to render', playlistStore.getAllPlaylists());
    response.render('dashboard', viewData);
  },
};

...
In the above we are calling playlistStore.getAllPlaylists() in order to get the playlists to render to the same view.
Finally, the playlists controller + view can be implemented:
controllers/playlist.js
'use strict';

const logger = require('../utils/logger');
const playlistStore = require('../models/playlist-store');

const playlist = {
  index(request, response) {
    const playlistId = request.params.id;
    logger.debug('Playlist id = ', playlistId);
    const viewData = {
      title: 'Playlist',
      playlist: playlistStore.getPlaylist(playlistId),
    };
    response.render('playlist', viewData);
  },
};

module.exports = playlist;
views/playlist.hbs
{{> menu}}

<section class="ui center aligned middle aligned segment">
  <h2 class="ui header">
    {{playlist.title}}
  </h2>
  {{> listsongs}}
</section>
The app should now run as expected, with playlist summaries on the dashboard, and a view link rendering the playlists details.
Deleting Songs 1
Having a playlist app, without the ability to create/delete songs or playlists is clearly very limited. We have, essentially, an app that allows us to Read our models, but not Create, Update or Delete elements of the model.
We can start with providing a facility to delete songs from individual playlists. Our view will need to look like this:
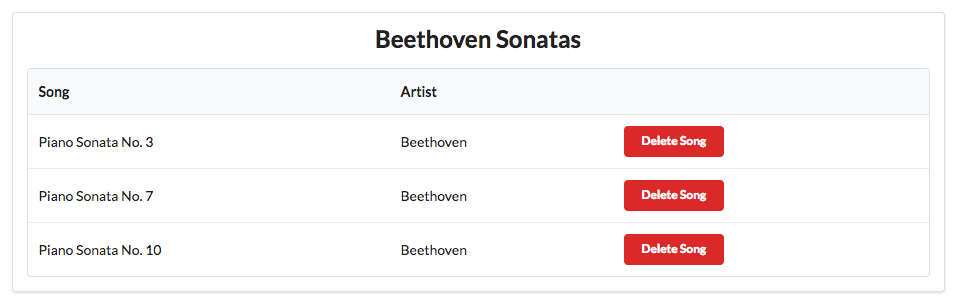
and deleting a button should remove the corresponding song.
Any new button/link/action on our page requires:
- an element in a view
- a route matching the view element
- a matching controller function
.. and it may also involve some interaction with the model.
View
The new button must appear in each song row:
views/partials/listsongs.hbs
    ...
        <td>
          <a href="/playlist/{{../playlist.id}}/deletesong/{{id}}" class="ui tiny red button">Delete Song</a>
        </td>
    ...
Route
A new route - containing both the playlist and song id - and linking to a new function in the playlist controller:
routes.js
router.get('/playlist/:id/deletesong/:songid', playlist.deleteSong);Controller
This is a new function to handle this route:
controllers/playlist.js
  deleteSong(request, response) {
    const playlistId = request.params.id;
    const songId = request.params.songid;
    logger.debug(`Deleting Song ${songId} from Playlist ${playlistId}`);
    playlistStore.removeSong(playlistId, songId);
    response.redirect('/playlist/' + playlistId);
  },
Model
The model now needs a new method to delete a song, given the id of the playlist and the song:
models/playlist-store.js
  removeSong(id, songId) {
    const playlist = this.getPlaylist(id);
    // remove the song with id songId from the playlist
  },
Try all of this now - and verify that the logs shows the attempt to delete the song when the button is pressed.
We havent yet deleted the song - we will leave that to the next step.
Deleting Songs 2
There are many techniques for deleting an element from an array, which require more in depth Javascript knowledge. However, we have a simpler solution for the moment via the lodash library.
At the top of our playlist-store.js module, import this library:
models/playlist-store.js
const _ = require('lodash');Here is the complete removeSong function:
  removeSong(id, songId) {
    const playlist = this.getPlaylist(id);
    _.remove(playlist.songs, { id: songId });
  },
This library is already installed in our project template - and you can read about how it works and what is does:
This is a modern, comprehensive library for managing data structures in Javascript. Watch this video:
Which will give you a very brief idea of some of the features of this library. This library has many features and capabilities and we will explore some of them in subsequent labs.
As a start - we can simplify the getPlaylist function:
  getPlaylist(id) {
    let foundPlaylist = null;
    for (let playlist of this.playlistCollection) {
      if (id == playlist.id) {
        foundPlaylist = playlist;
      }
    }

    return foundPlaylist;
  },
This performs a linear search to locate and return a playlist with a matching id. This can be simplified using lodash:
  getPlaylist(id) {
    return _.find(this.playlistCollection, { id: id });
  },
In future, when we are working with our playlists, we will usually check with lodash when we need to do anything, to see if it has a shorter/easier technique than writing our own algorithms.
For some more advanced uses, skim read this:
Exercises
If you want to download a complete version of the app as it should be at the end of this lab, then create a new Gomix project, and import edeleastar/gomix-playlist-2.
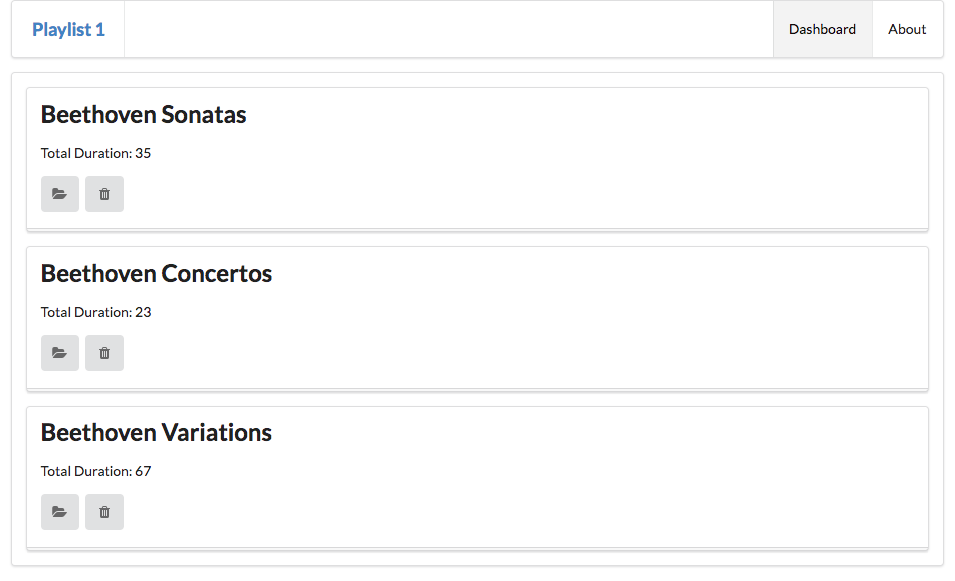
Exercise 1: UX Enhancements
Introduce a 'Delete Playlist' button for each playlist, represented by a trash icon. E.g:

In addition, the view link is replace by a folder open icon.
Bind the delete playlist button to a new function to be implemented in the Dashboard controller, which should log the id of the playlist to be deleted.
Exercise 2: Delete Playlist Functionality
Make the button actually delete the denoted playlist.
HINT: This is a new function in the playlist-store module to delete a playlist, given an ID:
removePlaylist(id) {
  _.remove(this.playlistCollection, { id: id });
},
Try to implement the rest of the feature, using the song delete feature as a guide.
Exercise 3: listplaylists partial
This is the current dashoard.hbs partial:
{{> menu id="dashboard"}}

{{#each playlists}}
  <section class="ui segment">
    <h2 class="ui header">
      {{title}}
    </h2>
    <p> Total Duration: {{duration}} </p>
    <a href="/playlist/{{id}}" class="ui icon button">
      <i class="icon folder open"></i>
    </a>
    <a href="/dashboard/deleteplaylist/{{id}}" class="ui icon button">
      <i class="icon trash"></i>
    </a>
  </section>
{{/each}}
Replace the above with this version:
{{> menu id="dashboard"}}

<section class="ui segment">
  {{> listplaylists}}
</section>
This requires you to write a new partial called listplaylists.
Here is how the dashboard should look when complete: