ViewPager
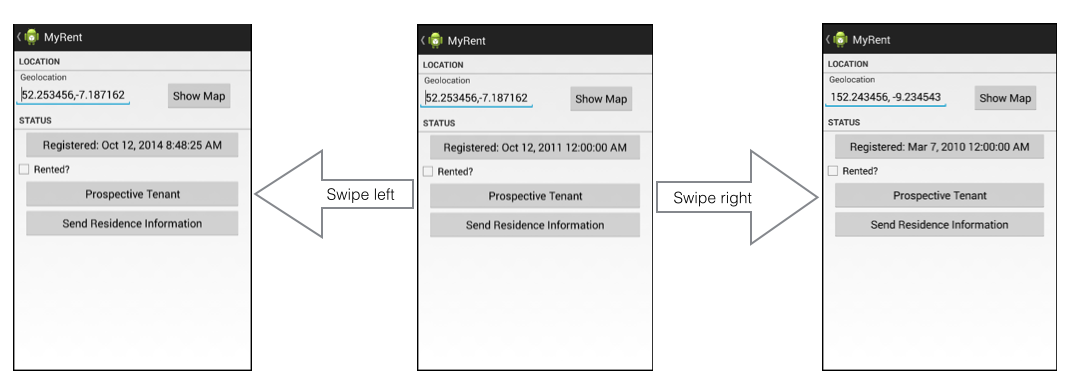
Here we incorporate a new feature to support horizontal 'swipe' interaction. This allows a user to page through the entire residence list, beginning from within any details view, in either direction. In providing this feature, we make of the Android ViewPager layout manager PageAdapter abstract class.
ViewPager
Continue building MyRent from the end of the previous lab.
Here we shall refactor MyRent by incorporating a ViewPager.
- This will allow us to swipe between pages as illustrated in Figure 1.
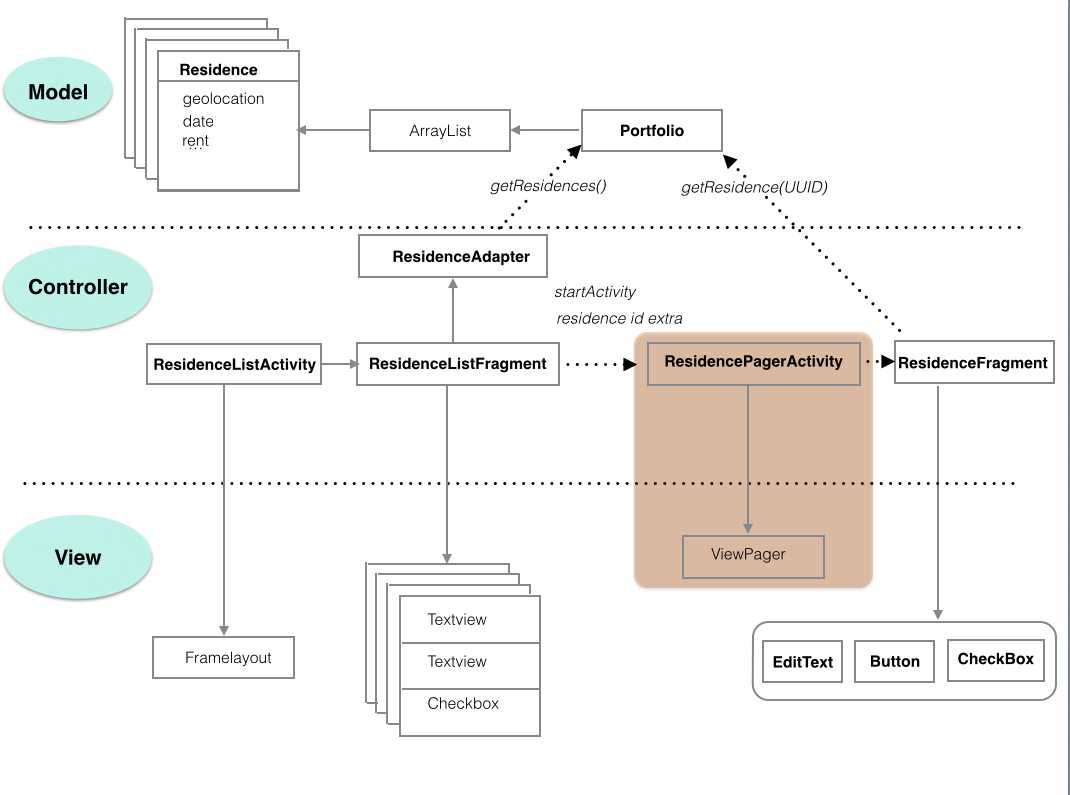
The refactoring is shown in Figure 2 where the changes are highlighted: compare this object diagram to that in the previous step and you will see that the main change is the replacement of ResidenceActivity with a new class ResidencePagerActivity.
Create ResidencePagerActivity
Delete or refactor ResidenceActivity and replace with ResidencePagerActivity, the code for which follows. Refactoring will have the advantage of renaming any other instances of ResidenceActivity in the application.
Filename: ResidencePagerActivity.java
package org.wit.myrent.activities;

import android.os.Bundle;
import android.support.v4.view.ViewPager;
import android.support.v7.app.AppCompatActivity;

public class ResidencePagerActivity extends AppCompatActivity
{
  private ViewPager viewPager;


  @Override
  public void onCreate(Bundle savedInstanceState)
  {
    super.onCreate(savedInstanceState);
  }
}
Create and show ViewPager:
- Add this code to ResidencePagerActivity.onCreate following the call to super.onCreate.
- This creates a view programatically.
    viewPager = new ViewPager(this);
    viewPager.setId(R.id.viewPager);
    setContentView(viewPager);
Import:
import android.support.v4.view.ViewPager;
import org.wit.myrent.R;
Next we introduce code to facilitate retrieval of views that are required as a user swipes left or right.
Introduce instance variables for a list of residences and portfolio:
  private ArrayList<Residence> residences;
  private Portfolio portfolio;
These import statements are required:
import org.wit.myrent.models.Portfolio;
import org.wit.myrent.models.Residence;
import java.util.ArrayList;
Add this private method to obtain a reference to the list of references stored in the model layer:
  private void setResidenceList()
  {
    MyRentApp app = (MyRentApp) getApplication();
    portfolio = app.portfolio;
    residences = portfolio.residences;
  }
An import statement for MyRentApp is necessary:
import org.wit.myrent.app.MyRentApp;Invoke setResidenceList immediately following setContentView in onCreate.
setResidenceList();Declare a PageAdapter instance variable. We shall implement this class in a future step.
private PagerAdapter pagerAdapter;import android.support.v4.view.ViewPager;Instantiate the pageAdapter at the end of onCreate:
pagerAdapter = new PagerAdapter(getSupportFragmentManager(), residences);Use the newly created PageAdapter object as a parameter in ViewPager.setAdapter:
viewPager.setAdapter(pagerAdapter);Errors will be generated because we have yet to define PagerAdapter. This we shall do in a future step.
PagerAdapter
Here we implement the PagerAdapter class. Since it is being used only by ResidencePagerActivity, we shall make it a nested class, located as shown here in Figure 1.
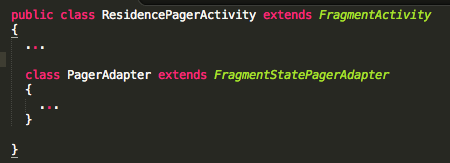
  class PagerAdapter extends FragmentStatePagerAdapter
  {
    private ArrayList<Residence>  residences;

    public PagerAdapter(FragmentManager fm, ArrayList<Residence> residences)
    {
      super(fm);
      this.residences = residences;
    }

    @Override
    public int getCount()
    {
      return residences.size();
    }

    @Override
    public Fragment getItem(int pos)
    {
      Residence residence = residences.get(pos);
      Bundle args = new Bundle();
      args.putSerializable(ResidenceFragment.EXTRA_RESIDENCE_ID, residence.id);
      ResidenceFragment fragment = new ResidenceFragment();
      fragment.setArguments(args);
      return fragment;
    }
  }
These import statements are required by PageAdapter:
import android.support.v4.app.Fragment;
import android.support.v4.app.FragmentManager;
import android.support.v4.app.FragmentStatePagerAdapter;
Resources (ViewPager)
Create a new file ids.xml in res/values folder which will be used to store viewPager id numbers:
Filename: ids.xml
<resources>
    <item type="id" name="viewPager" />
</resources>
Change the ResidenceActivity node in the manifest file to ResidencePagerActivity. This should already be the case if you chose refactoring in the previous step.

    <activity
        android:name=".activities.ResidencePagerActivity"
        android:label="@string/app_name">

        <meta-data
          android:name="android.support.PARENT_ACTIVITY"
          android:value=".activities.ResidenceListActivity"/>
    </activity>
ResidenceFragment
Replace this line in ResidenceFragment:
Long resId (Long)getActivity().getIntent().getSerializableExtre(EXTRA_RESIDENCE_ID);with this:
Long resId = (Long)getArguments().getSerializable(EXTRA_RESIDENCE_ID);This last line of code extracts the current residence id from the Bundle object that was created in the PagerAdapter.getItem method which is located in the file ResidencePagerActivity.
- There we added a fragment argument to the Bundle object. The value of this argument is the current residence id.
- See here for a brief summary of fragment arguments taken from the Android Book by Hardy & Philips:

Set current item
The following code is required to ensure that the correct residence detail view is opened when you click on a residence in the list.
Implement setCurrentItem in ResidencePagerActivity:
  /*
  * Ensure selected residence is shown in details view
  */
  private void setCurrentItem() {
    Long resId = (Long) getIntent().getSerializableExtra(ResidenceFragment.EXTRA_RESIDENCE_ID);
    for (int i = 0; i < residences.size(); i++) {
      if (residences.get(i).id.equals(resId)) {
        viewPager.setCurrentItem(i);
        break;
      }
    }
  }
Invoke
setCurrentItemat the end ofResidencePagerActivity.onCreate. Here is a brief description of the how it works:- obtain the id of the residence to be displayed in the details view from the activity intent,
- iterate through the list of residences to find a match
- having found a matching residence, invoke
viewPager.setCurrentItemusing the index position of the residence object as an argument.
Here is the final onCreate:
  @Override
  public void onCreate(Bundle savedInstanceState)
  {
    super.onCreate(savedInstanceState);
    viewPager = new ViewPager(this);
    viewPager.setId(R.id.viewPager);
    setContentView(viewPager);
    setResidenceList();
    pagerAdapter = new PagerAdapter(getSupportFragmentManager(), residences);
    viewPager.setAdapter(pagerAdapter);
    setCurrentItem();

  }
Integrate ResidencePagerActivity
To date in ResidenceListActivity.onListItemClick:
- When a list item is clicked the ResidenceActivity is started.
We now wish to start ResidencePagerActivity:
- To do so, in ResidenceListFragment, replace the following code:

with this:
Intent i = new Intent(getActivity(), ResidencePagerActivity.class);In ResidenceListFragment, replace any other references to ResidenceActivity with ResidencePagerActivity.
Note that if you choose refactoring in step-03 then the name changes should already have taken place.
Test the app at this stage: the swipe feature should be available. In particular conduct the following checks:
- Create three residences, assigning different latitudes to each so as to easiy distinguish between them.
- In the residence list click on each item in turn and verify that the correct detail view is displayed.
- Exercise the swipe feature both left and right horizontally.
- To swipe on an emulator click and hold down the left mouse button on any detail view and then more the mouse left or right. Should you have difficulty doing so on an emulator, try it on a physical device.
Listener
The code implemented in the previous steps is sufficient to allow detailed residence pages to be swiped left and right. The following instructions show how you can intervene when a new page is displayed and perform some other tasks. Soley for demonstration purposes we choose to change the label in the action bar to display the geolocation rather than the application name. Here is how it's done.
Change the signature of ResidencePagerActivity so as to implement ViewPager.OnPageChangeListener:
public class ResidencePagerActivity extends AppCompatActivity implements ViewPager.OnPageChangeListenerThis change requires the implementation of these interface methods:
  @Override
  public void onPageScrolled(int position, float positionOffset, int positionOffsetPixels)
  {

  }

  @Override
  public void onPageSelected(int position)
  {

  }

  @Override
  public void onPageScrollStateChanged(int state)
  {

  }
We are only interested in full implementation of onPageScrolled. Here it is:
  @Override
  public void onPageScrolled(int position, float positionOffset, int positionOffsetPixels) {
    info(this, "onPageScrolled: position "+ position +" arg1 "+ positionOffset +" positionOffsetPixels "+ positionOffsetPixels);
    Residence residence = residences.get(position);
    if (residence.geolocation != null)
    {
      setTitle(residence.geolocation);
    }
The method info is implemented in the helpers folder and may be imported in a similar manner as previously in, for example, ResidenceFragment.
This last feature is illustrated in Figure 1 below.

Register the OnPageListener
viewPager.addOnPageChangeListener(this);Import the info helper:
import static org.wit.android.helpers.LogHelpers.info;For reference, these are the imports required.
- Note that in some cases more than one option is available.
import android.os.Bundle;
import android.support.v4.app.Fragment;
import android.support.v4.app.FragmentManager;
import android.support.v4.app.FragmentStatePagerAdapter;
import android.support.v4.view.ViewPager;
import android.support.v7.app.AppCompatActivity;
import org.wit.myrent.R;
import org.wit.myrent.app.MyRentApp;
import org.wit.myrent.models.Portfolio;
import org.wit.myrent.models.Residence;
import java.util.ArrayList;
import static org.wit.android.helpers.LogHelpers.info;
Deploy the apk and verify that the action bar now displays the geolocation (latitude-longitude) corresponding to the rendered residence detail view.
Test
Build and run the app and verify the page swipe functions correctly.
- If using the Android emulator, click on a residence details view and maintaining a button press swipe left or right (assuming at least 2 residence list items exist).
The application at the end of this lab is available for reference here: myrent-09